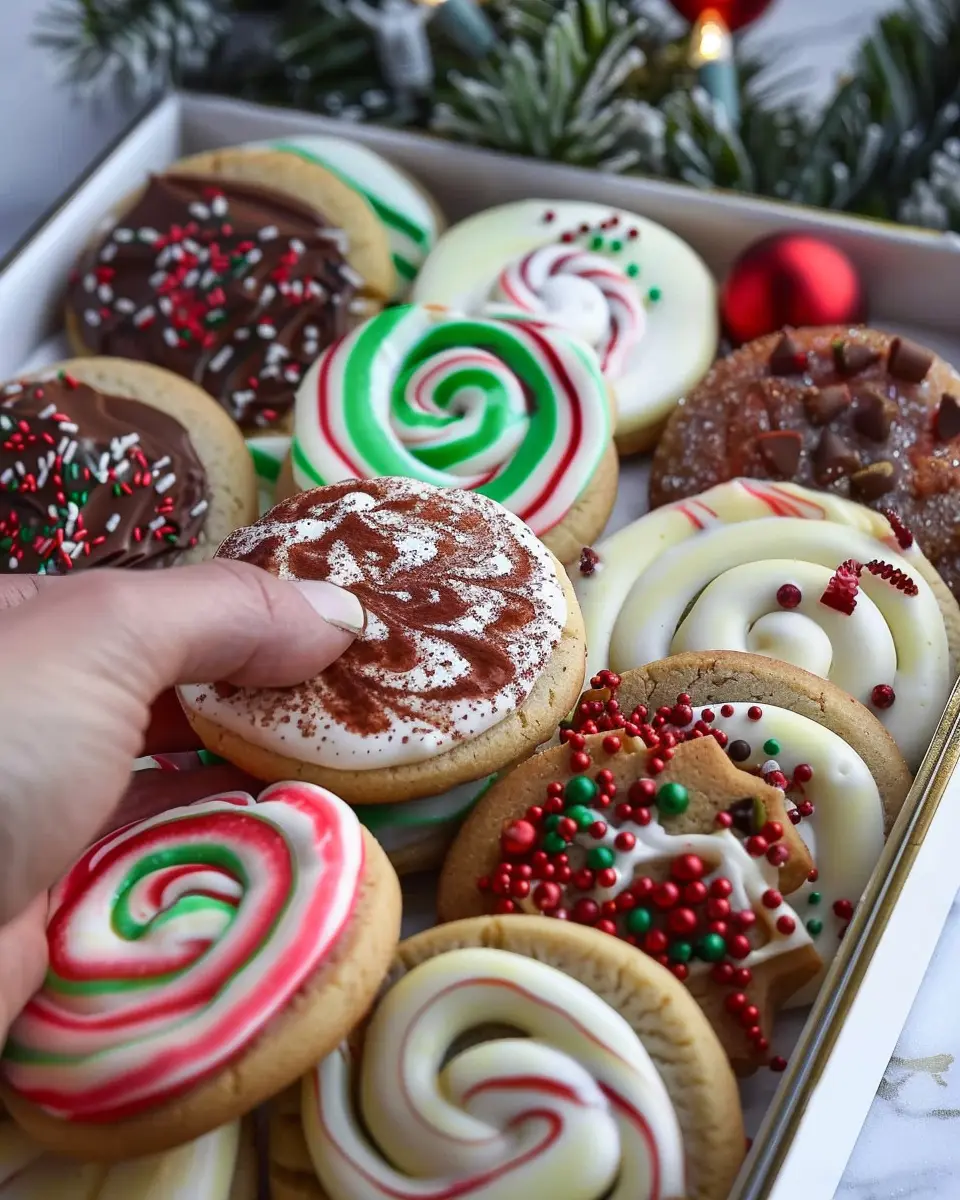
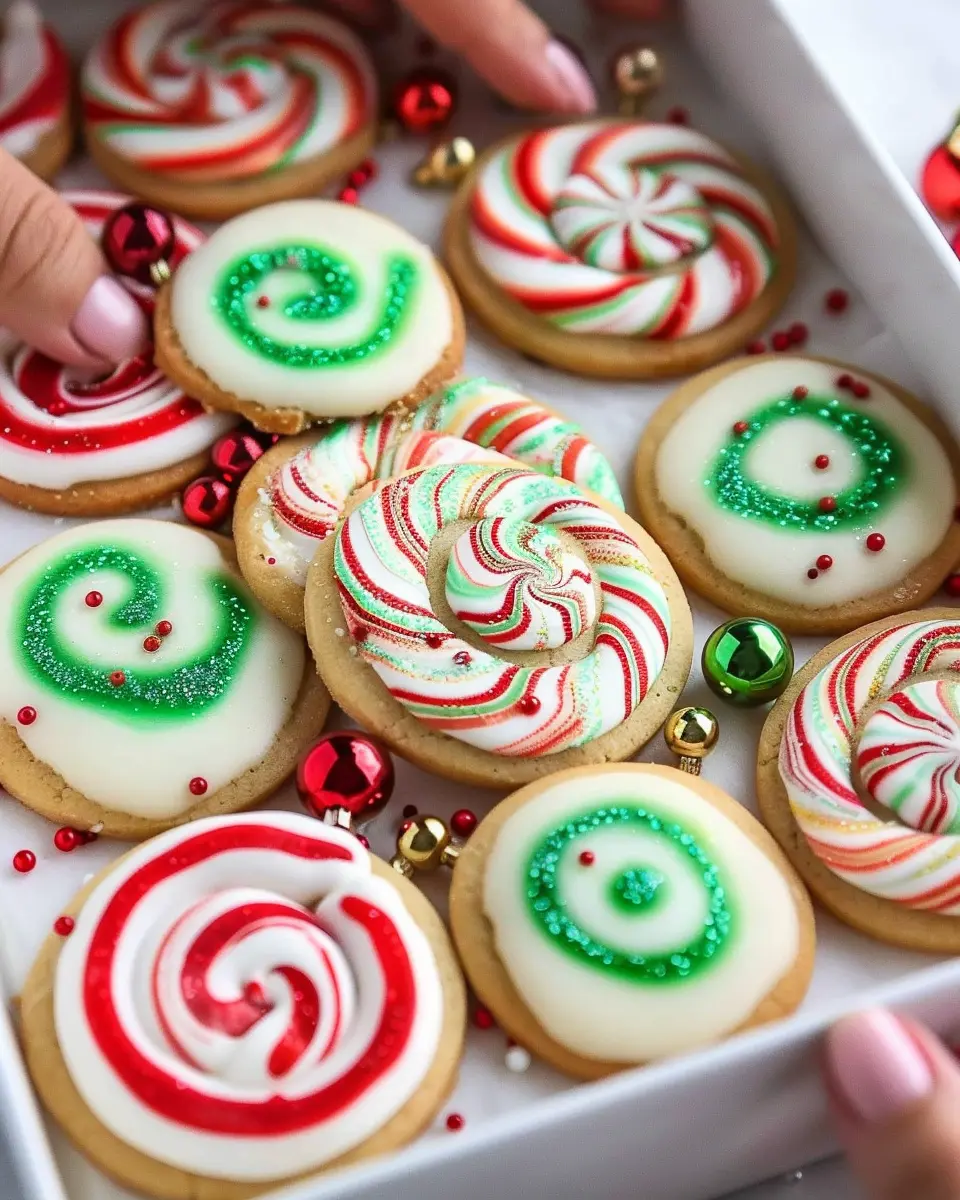
Introduction to Swirled Christmas Cookies
It’s that magical time of year again when the scent of baking fills the air, blending with the joyful sounds of holiday chatter. One of the most beloved traditions during the festive season is baking Christmas cookies. Among the plethora of cookie varieties, swirled Christmas cookies stand out not only for their pleasing aesthetics but also for their delightful flavors.
Why are Swirled Christmas Cookies a Holiday Favorite?
So, what makes swirled Christmas cookies such a hit during the holidays? For starters, they are a feast for the eyes. The vibrant colors and whimsical patterns formed by swirling dough create a festive flair that’s simply irresistible. Whether you’re preparing for a holiday gathering or a cozy night in, these cookies add a touch of cheer to any occasion.
Moreover, swirled Christmas cookies are incredibly versatile. You can get creative with different flavor combinations—from classic vanilla and chocolate to peppermint and gingerbread, the options are endless. This versatility allows you to cater to various tastes, ensuring everyone finds a cookie they’ll adore. According to a survey by the Food Network, two-thirds of Americans sometimes bake cookies during the holidays, highlighting just how integral they are to our festive traditions.
Another reason these cookies shine during the holidays is their potential for customization. Many families have their own unique takes on the recipe, often passed down through generations. Maybe you add a hint of orange zest or a sprinkle of nutmeg—whatever your twist, it adds a special touch that connects your baking to cherished memories. Plus, making these cookies can be a fun activity with friends or family, allowing you to bond while creating something delicious.
As you begin to prepare your cookie dough, consider checking out resources from experts like King Arthur Baking for tips on perfecting your technique. You might also explore flavor pairings at sites like Serious Eats to inspire your creativity!
In the spirit of the season, let’s dive into our delightful recipe for swirled Christmas cookies, ensuring you have all you need to spread joy (and a little sweetness) this holiday season.
Ingredients for Swirled Christmas Cookies
Essential ingredients for making swirled cookies
Creating swirled Christmas cookies is all about balance and flavor. You’ll need these essential ingredients:
- All-purpose flour: This forms the base and gives your cookies structure.
- Granulated sugar: For that delightful sweetness.
- Butter: Use unsalted for better control over saltiness.
- Eggs: They bind everything together while adding richness.
- Baking powder: A must for that fluffy, rise that makes cookies irresistible.
- Vanilla extract: This simple add-in brings warmth and depth to your cookies.
Once you mix these, you’ll create a dough that’s perfect for swirling.
Optional items to enhance flavor and decoration
Want to take your swirled Christmas cookies to the next level? Consider these optional ingredients:
- Food coloring: Perfect for vibrant swirls that catch the eye.
- Chocolate chips or chunks: Because what’s a cookie without chocolate?
- Sprinkles: Great for festive decoration, making your cookies extra special.
Including these enhancements not only amplifies flavor but also adds visual appeal. It’s like putting the icing on the cake—quite literally! For more tips on cookie decorating, you can check out this guide on enhancing dessert presentations.
Incorporating these ingredients ensures your swirled cookies are not just tasty but also a joy to behold. So, which ingredients are you excited to use?
Step-by-Step Preparation for Swirled Christmas Cookies
When it comes to holiday baking, swirled Christmas cookies are a standout treat that’s as fun to make as they are to eat. The vibrant colors and delightful taste can bring cheer and warmth to any gathering. Let’s dive into the step-by-step preparation process to make these festive delights.
Cream the butter and sugar
Start by taking your unsalted butter out of the fridge to soften. About half a cup should be perfect—it will yield a creamy texture that blends easily. In a large mixing bowl, combine the softened butter with one cup of granulated sugar. Use an electric mixer or a good old-fashioned wooden spoon to beat them together until the mixture becomes light and fluffy, which usually takes about 3-5 minutes. This crucial step not only combines ingredients but also incorporates air into the batter, keeping your cookies light.
Feeling adventurous? Consider experimenting with brown sugar instead of granulated sugar for a deeper flavor profile.
Add in the egg and extracts
Once your butter and sugar are nicely blended, it’s time to bring in the wet ingredients. Add one medium egg, making sure it’s at room temperature for ideal mixture balance. Next, drizzle in one teaspoon each of vanilla and almond extracts. Why almond? It adds a subtle, nutty flavor that complements the vanilla beautifully. Mix until everything is just combined. Be careful not to overmix, as this can make your cookies tough—nobody wants that!
Incorporate dry ingredients
In a separate bowl, whisk together two cups of all-purpose flour, a teaspoon of baking powder, and a pinch of salt. The baking powder is essential for that delightful lift. Gradually add this dry mixture to your wet ingredients, mixing until just combined again. The dough will start to come together beautifully at this point.
Divide and color the dough
To create that eye-catching swirl, divide your dough in half, placing each portion in separate bowls. For the fun part—coloring! You can use gel food coloring for vibrant hues that won’t affect your cookie’s texture. Start with a few drops, blend thoroughly, and adjust until you reach your desired shade. Think about using classic Christmas colors like red and green for that festive spirit!
Chill the dough properly
After coloring, wrap the dough portions in plastic wrap and refrigerate them for at least 30 minutes. Chilling the cookie dough helps solidify the fats, which leads to cookies that hold their shape better during baking. Trust me, a little patience here pays off!
Roll, stack, and shape the dough
Once chilled, take the dough out of the fridge. On a floured surface, roll out one color to about 1/4-inch thickness. Then, take your second color and do the same. Place one on top of the other and gently press them together. Now, roll up the dough tightly to form a log. Wrap the log in plastic wrap and chill again for about an hour. This will ensure a clean cut when you slice your cookies.
Coat with sprinkles
When your dough is chilled and ready, unwrap it and dip the log into a plate of colored sprinkles. Make your cookie log festive by rolling it around so that the sprinkles evenly coat all sides.
Slice and bake the cookies
Preheat your oven to 350°F (about 175°C). Prepare a baking sheet lined with parchment paper. Using a sharp knife, slice the cookie log into 1/4-inch thick rounds. Place the slices on the baking sheet, leaving space for spreading. Bake them for around 10-12 minutes, or until the edges are lightly golden. Cool on the baking sheet for a couple of minutes before transferring to a wire rack to cool completely.
By following these steps, you’ll create a batch of swirled Christmas cookies that not only look beautiful but taste fantastic too! Each bite is a delightful mix of buttery sweetness and festive cheer, making them the perfect addition to your holiday festivities or as a thoughtful gift. Happy baking!
Variations on Swirled Christmas Cookies
Festive Variations for Different Holidays
Swirled Christmas cookies are not just for the holidays! With a little creativity, you can adapt these delicious treats for various occasions throughout the year. Think about adding seasonal colors for Valentine’s Day, Easter, or even Halloween. For instance, you can use pink and red hues for a romantic twist on swirled cookies or orange and black for Halloween. The beauty of these cookies lies in their versatility. Just switch up the food coloring in your frosting or dough for that festive feel!
For other holidays, consider adding themed sprinkles or incorporating fun shapes with cookie cutters. The options are endless—don’t be afraid to experiment! You can explore more ideas for cookie decorations at sites like Taste of Home or Martha Stewart.
Flavorful Twists for the Cookie Dough
Now, let’s talk about how to make your swirled Christmas cookies even more irresistible! Instead of sticking to traditional vanilla or chocolate flavors, consider infusing your dough with unique tastes. Here are a few flavorful twists:
- Peppermint: Add peppermint extract for a refreshing twist, perfect for the winter holidays.
- Cinnamon Bun: Mix in ground cinnamon and a hint of nutmeg for a cozy spice experience.
- Lemon Zest: Brighten things up with some lemon zest, bringing a delightful zing to your cookies.
By incorporating these flavors, you’re not just baking cookies; you’re creating memorable moments around the table with friends and family. Who doesn’t love a cookie that surprises and delights?
Baking Notes for Swirled Christmas Cookies
Key tips for achieving the perfect swirls
Creating swirled Christmas cookies is all about mastering the technique. Here are some tips to help you nail those beautiful swirls:
- Chill Your Dough: After making your dough, it’s essential to chill it for at least 30 minutes. This makes it firmer and easier to work with.
- Use Color Wisely: When adding color to your dough, think about contrast. Red and green are classic, but you could even experiment with blue and white for a wintry theme.
- Rolling Technique: Roll each colored dough into logs of equal size. Having matching logs makes the swirls more uniform and visually appealing.
Common mistakes to avoid while baking
Even seasoned bakers can make slips that lead to less-than-perfect cookies. Here are some common pitfalls to avoid:
- Overmixing the Dough: This can lead to tough cookies. Mix until just combined and don’t be afraid of small lumps.
- Not Measuring Accurately: Baking is a science, so make sure to use a scale or accurate measuring cups. Too much flour can ruin your swirls.
- Skipping the Cooling Step: Allow baked cookies to cool on the pan for a few minutes before transferring them to a wire rack; this keeps them from breaking apart.
For more insights on cookie baking, check out resources like King Arthur Baking for expert advice. Happy baking!

Serving Suggestions for Swirled Christmas Cookies
Creative Ways to Serve During Holiday Gatherings
Swirled Christmas cookies are not just a delightful treat; they can also be the star of your holiday gatherings. To add some flair to your presentation, consider serving them on a decorative platter alongside complementary treats like hot cocoa or spiced apple cider. Arrange them in a circular pattern and garnish with edible glitter or festive sprinkles for a colorful touch. Think about creating a cookie bar where guests can mix and match their favorite cookies with toppings—mini marshmallows, chocolate chips, or even crushed peppermint.
Packaging Ideas for Gifting Cookies
The festive season is also about sharing. Gift your swirled Christmas cookies with charm by packaging them in stylish boxes or mason jars. Layer the cookies with colorful tissue paper for a pop of color and seal them with a ribbon. You could even add a handwritten note for a personal touch; people love that thoughtful gesture! For more inspiration on gifting creativity, check out Real Simple’s gift ideas. Your elegantly presented cookies will surely make smiles brighter this holiday season!
Tips for Making Perfect Swirled Christmas Cookies
Best Practices for Consistency
When it comes to achieving those picture-perfect swirled Christmas cookies, consistency is key. Here are some best practices to follow:
- Chill Your Dough: Before rolling it out, chill your dough for at least 30 minutes. This helps prevent the colors from melding too much when you swirl.
- Equal Portions: Divide your dough into equal portions for easy mixing. When swirling, aim for a 50/50 ratio of each color.
- Gentle Twists: Use a gentle hand when swirling. You want to create beautiful patterns without over-mixing, which can lead to muddy colors.
For even more tips, check out this guide on cookie consistency from The Baker’s Dozen.
How to Store Leftover Cookies
Once your stunning swirled Christmas cookies are baked and cooled, storing them properly ensures they stay fresh and delightful. Consider these tips:
- Airtight Containers: Use airtight containers to keep your cookies soft. Layer parchment paper between layers to avoid sticking.
- Room Temperature: Store at room temperature for up to a week, or freeze them for longer storage. Just wrap individual cookies in plastic wrap, then place them in a freezer-safe bag.
- Thawing: When you’re ready to enjoy your frozen cookies, simply let them sit at room temperature for about an hour.
Following these simple tips will ensure your festive creations remain a hit throughout the holiday season. Enjoy the smiles and compliments that come your way!
Time Breakdown for Swirled Christmas Cookies
When it comes to baking the perfect swirled Christmas cookies, understanding the time commitment is key. Here’s a quick overview to help you plan your cookie-making adventure!
Preparation Time
You’ll want to set aside about 20 minutes for the initial mixing and rolling of your dough. This is when the magic begins, and the vibrant colors will start to swirl together!
Chilling Time
During the chilling phase, which takes about 1 hour, the dough gains structure. This is the perfect time to clean up your prep area or sip on a warm cup of cocoa.
Baking Time
The actual baking is fairly quick, coming in at around 10–12 minutes. You’ll be able to enjoy the delightful aroma filling your kitchen!
Total Time
All in all, from start to finish, you’re looking at roughly 1 hour and 40 minutes before you can indulge in your delicious swirled Christmas cookies. Perfect for a cozy evening, don’t you think?
For more ideas on holiday treats, check out sites like King Arthur Baking or Food Network for inspiration beyond cookies!
Nutritional Facts for Swirled Christmas Cookies
Calories per cookie
When it comes to enjoying swirled Christmas cookies, moderation is key. On average, each cookie contains about 100 calories. This makes them a delightful treat without overindulging during the festive season.
Key nutritional components
These swirled Christmas cookies boast a few notable nutritional components:
- Carbohydrates: Each cookie offers around 15 grams of carbs, providing a quick energy boost.
- Fats: With approximately 5 grams of fat per cookie, they have a delightful, rich texture.
- Sugars: Expect about 6 grams of sugar, thanks to the sweet icing and swirls.
When baking, consider substituting lower-sugar options like honey or agave for a healthier twist. For more insights, check out resources like the USDA’s food database for a clearer picture of cookie nutrition.
So, the next time you’re indulging in these festive delights, remember: it’s all about balance! How do you like to enjoy your cookies?
FAQs about Swirled Christmas Cookies
Can I make the dough in advance?
Absolutely! Making the dough in advance is a great time-saver, especially during the busy holiday season. You can prepare the swirled Christmas cookies dough up to a week ahead of time. Just wrap it tightly in plastic wrap or place it in an airtight container and refrigerate. When you’re ready to bake, simply roll it out, cut it into shapes, and enjoy the delightful aroma filling your kitchen!
What can I use if I don’t have gel food coloring?
No gel food coloring? No problem! You can easily substitute with liquid food coloring, although you might need to use a little more to achieve the same vibrant colors. If you prefer a more natural approach, consider using vegetable purees like beet juice for red or spinach for green. The result may vary slightly, but you’ll end up with equally festive swirled cookies that are just as delicious.
How to keep cookies fresh for a longer time?
To keep your swirled Christmas cookies fresh, store them in an airtight container at room temperature. Adding a slice of bread can help maintain moisture and softness. For longer storage, consider freezing them! Place cooled cookies in a single layer on a baking sheet, freeze until solid, then transfer to an airtight bag or container. They’ll retain their delightful flavors for up to three months. For more tips on cookie storage, check out sources like the American Institute of Baking.
With these tips, your festive baking will be easier and more enjoyable. Happy baking and sharing delicious treats!
Conclusion on Swirled Christmas Cookies
Baking swirled Christmas cookies is not just about creating a delicious treat; it’s about embracing the joy of the holiday season through sharing and connecting with others. There’s something magical about filling your kitchen with the warm aromas of butter and sugar while crafting these beautiful cookies. As you roll out the dough and swirl the colors together, you’ll find that each cookie tells a unique story.
Remember, sharing these delightful cookies with friends and family is equally rewarding. Consider packaging them in festive boxes for easy gifting or setting up a cookie exchange to connect with loved ones. For more baking inspiration, check out sites like Taste of Home or Bakerella for delicious ideas and techniques to enhance your baking repertoire.
So this holiday season, gather your ingredients, turn on some festive music, and let the joy of giving inspire you to create beautiful swirled Christmas cookies that your loved ones will cherish!
PrintSwirled Christmas Cookies: Easy and Festive Treats for Everyone
Delight in the festive spirit with these easy and colorful swirled Christmas cookies that are perfect for sharing!
- Prep Time: 30 minutes
- Cook Time: 12 minutes
- Total Time: 42 minutes
- Yield: 24 cookies 1x
- Category: Desserts
- Method: Baking
- Cuisine: American
- Diet: Vegetarian
Ingredients
- 2 cups all-purpose flour
- 1 cup unsalted butter, softened
- 1 cup granulated sugar
- 2 large eggs
- 1 teaspoon vanilla extract
- 1 teaspoon almond extract
- 1/2 teaspoon salt
- 1/2 teaspoon baking powder
- 1 cup red and green sprinkles
Instructions
- Preheat oven to 350°F (175°C).
- In a large bowl, cream together the butter and sugar until light and fluffy.
- Add the eggs, vanilla extract, and almond extract, and mix until well combined.
- In another bowl, whisk together the flour, salt, and baking powder. Gradually add to the wet ingredients and mix until just combined.
- Divide the dough into two parts. Add red food coloring to one part and green to the other, mixing until the colors are evenly distributed.
- Roll out each color into logs and twist them together to form a swirled effect.
- Slice the logs into cookies and place them on a baking sheet lined with parchment paper.
- Sprinkle with colored sprinkles before baking.
- Bake for 10-12 minutes or until the edges are lightly golden.
- Let cool on the baking sheet for a few minutes before transferring to a wire rack to cool completely.
Notes
- For softer cookies, do not overbake.
- Feel free to adjust food coloring to your preference.
Nutrition
- Serving Size: 1 cookie
- Calories: 100
- Sugar: 10g
- Sodium: 50mg
- Fat: 5g
- Saturated Fat: 3g
- Unsaturated Fat: 2g
- Trans Fat: 0g
- Carbohydrates: 12g
- Fiber: 0g
- Protein: 1g
- Cholesterol: 15mg
Keywords: Swirled Christmas Cookies, Christmas Treats, Holiday Baking