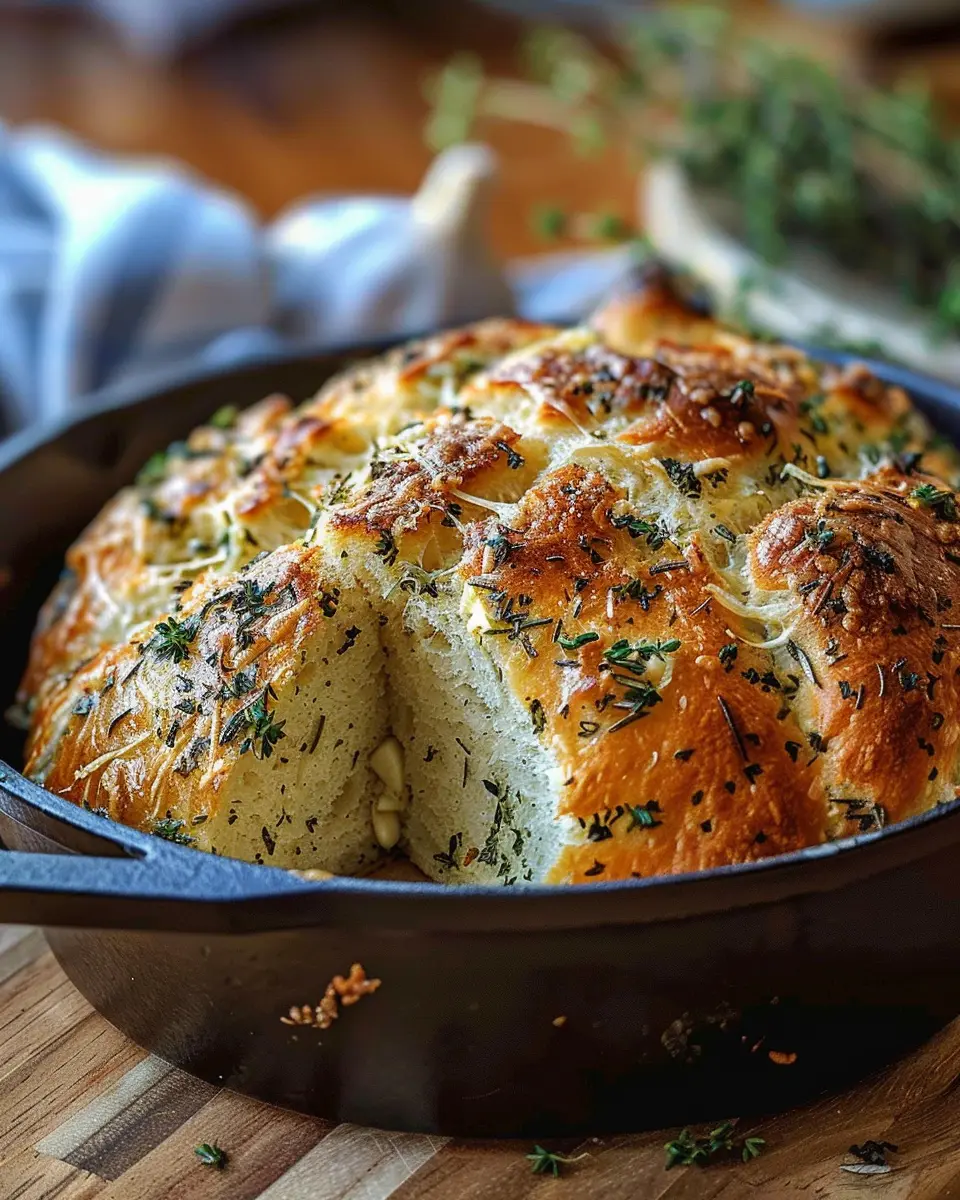
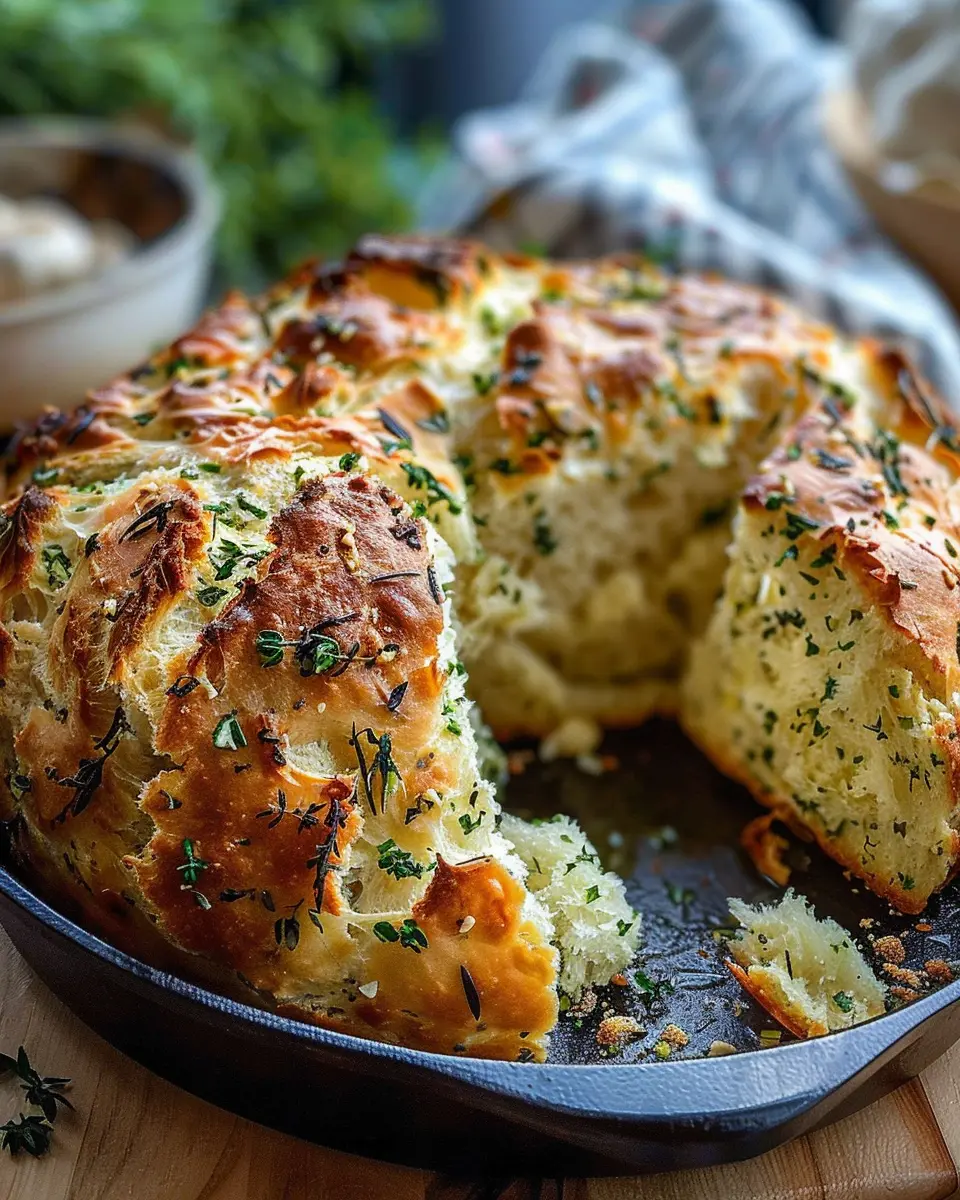
Introduction to Garlic Herb Dutch Oven Bread
If you’ve ever savored the warm, crusty perfection of homemade bread, you know it’s a culinary delight that’s hard to replicate from store-bought options. Nowadays, busy professionals might wonder how they can squeeze such an indulgence into their hectic schedules. Enter garlic herb dutch oven bread—a game-changing solution that combines simplicity with heartiness, all in the comforting confines of a Dutch oven.
Why Homemade Bread is a Game-Changer for Busy Professionals
Time is often our most precious commodity, especially for young professionals juggling work, social commitments, and personal projects. So, how can making fresh bread fit into your life without becoming an overwhelming chore?
-
Simple Ingredients: The beauty of garlic herb dutch oven bread lies in its uncomplicated recipe. With just a handful of pantry staples like flour, yeast, and, of course, garlic and herbs, you can whip up a gourmet experience without complicated grocery store runs. This recipe also allows for customization—toss in those herbs you forgot about or spices you adore.
-
Minimal Effort for Maximum Flavor: Dutch ovens are designed for slow cooking and even heat distribution. By mixing your dough and letting it rise while you tackle other chores, you can harness the power of artisan baking without sacrificing your time. Just imagine pulling apart a crusty loaf, revealing the soft, herb-infused insides while a buttery garlic aroma fills your kitchen.
-
Healthier Options: Creating your own bread at home allows you to control the ingredients. No preservatives, no artificial flavors—just pure, wholesome goodness. Plus, the satisfaction of knowing you made it from scratch? Unmatched.
-
Versatile Serving Options: Whether you’re pairing it with soups, making sandwiches with turkey bacon and chicken ham, or simply slathering on some butter, garlic herb dutch oven bread fits seamlessly into any meal—breakfast, lunch, dinner, or even as a snack.
Interested in diving deeper into the art of bread making? Check out resources like King Arthur Baking for more tips and tricks. Ready to get started? Let’s make some delicious memories with this garlic herb dutch oven bread!

Ingredients for Garlic Herb Dutch Oven Bread
Creating the perfect garlic herb Dutch oven bread begins with a simple yet delightful combination of ingredients. Let’s break it down!
Essential dry ingredients
To get started, you’ll need some foundational dry ingredients that provide structure and flavor:
- All-purpose flour: 4 cups for that wonderful texture.
- Salt: 1.5 teaspoons enhances the flavor and controls yeast growth.
- Instant yeast: 2 teaspoons for a quick rise.
- Dried Italian herbs: 2 tablespoons to infuse your bread with aromatic goodness.
Feel free to explore other herb blends that you love—thyme or rosemary could add a delightful twist!
Key wet ingredients and flavorings
Next, the wet ingredients complete the batter and help create that yummy, crusty exterior:
- Warm water: 1.5 cups (about 110°F) activates the yeast properly.
- Olive oil: 2 tablespoons adds richness and moisture.
- Fresh garlic: 3–4 cloves, minced, for that irresistible punch of flavor.
If you’re craving an extra boost, consider adding a splash of vegetable broth instead of plain water for added depth. You might just find it’s the secret ingredient to your new favorite recipe!
For more ideas on customizing your bread, check out this guide on baking breads. Happy baking!
Preparing Garlic Herb Dutch Oven Bread
Nothing says comfort like a warm loaf of homemade bread, especially when it’s infused with aromatic garlic and fresh herbs. Making garlic herb Dutch oven bread might seem daunting at first, but trust me, the process is simple, enjoyable, and remarkably rewarding. Let’s dive into preparing this fantastic treat step by step.
Gather Your Ingredients and Tools
Before you start, it’s essential to have everything in place—this will make your bread-making experience smooth and enjoyable. Here’s what you’ll need:
Ingredients:
- 3 cups all-purpose flour
- 1 ½ teaspoons salt
- 1 teaspoon sugar
- 1 teaspoon instant yeast
- 1 ½ cups warm water
- 3 cloves garlic, minced (or more if you love garlic!)
- 2 tablespoons fresh herbs (like rosemary, thyme, or parsley), chopped
Tools:
- A large mixing bowl
- A wooden spoon or spatula
- A kitchen towel or plastic wrap
- A Dutch oven with a lid
- Parchment paper
Having these ingredients and tools ready will ensure a seamless and enjoyable bread-making adventure!
Mix and Combine the Dry and Wet Ingredients
Start by mixing your dry ingredients in a large bowl. Combine the flour, salt, sugar, and yeast. Stir well to ensure everything is evenly distributed. In a separate bowl, mix the warm water with the minced garlic and fresh herbs.
Once well combined, pour the wet ingredients into the dry ingredients. Using a wooden spoon or spatula, mix until a shaggy dough forms. Don’t worry if it’s a little sticky; this is normal!
Let the Dough Rest – The Magic Happens Here!
After mixing, cover the bowl with a kitchen towel or plastic wrap. Allow the dough to rest for about 12 to 18 hours at room temperature. This is the time when the magic occurs! The long resting period allows the gluten to develop, leading to a wonderfully airy texture and rich flavor.
Preheat Your Dutch Oven to Perfection
When you’re ready to bake, it’s crucial to preheat your Dutch oven. Place it in the oven and preheat to 450°F (232°C). Preheating the pot helps to create a burst of steam when you add the dough, resulting in that charming, crusty exterior we all love.
Shape the Dough and Get It Ready for Baking
Once your dough has rested, lightly flour a clean surface and turn the dough out onto it. Gently shape it into a round loaf. Don’t be too rough; you want to preserve those lovely air pockets that formed during resting.
Using parchment paper can make getting the dough into the Dutch oven easier, so place your loaf on the parchment if you wish. Cover it again and let it rest for another 30 minutes while your Dutch oven continues to heat.
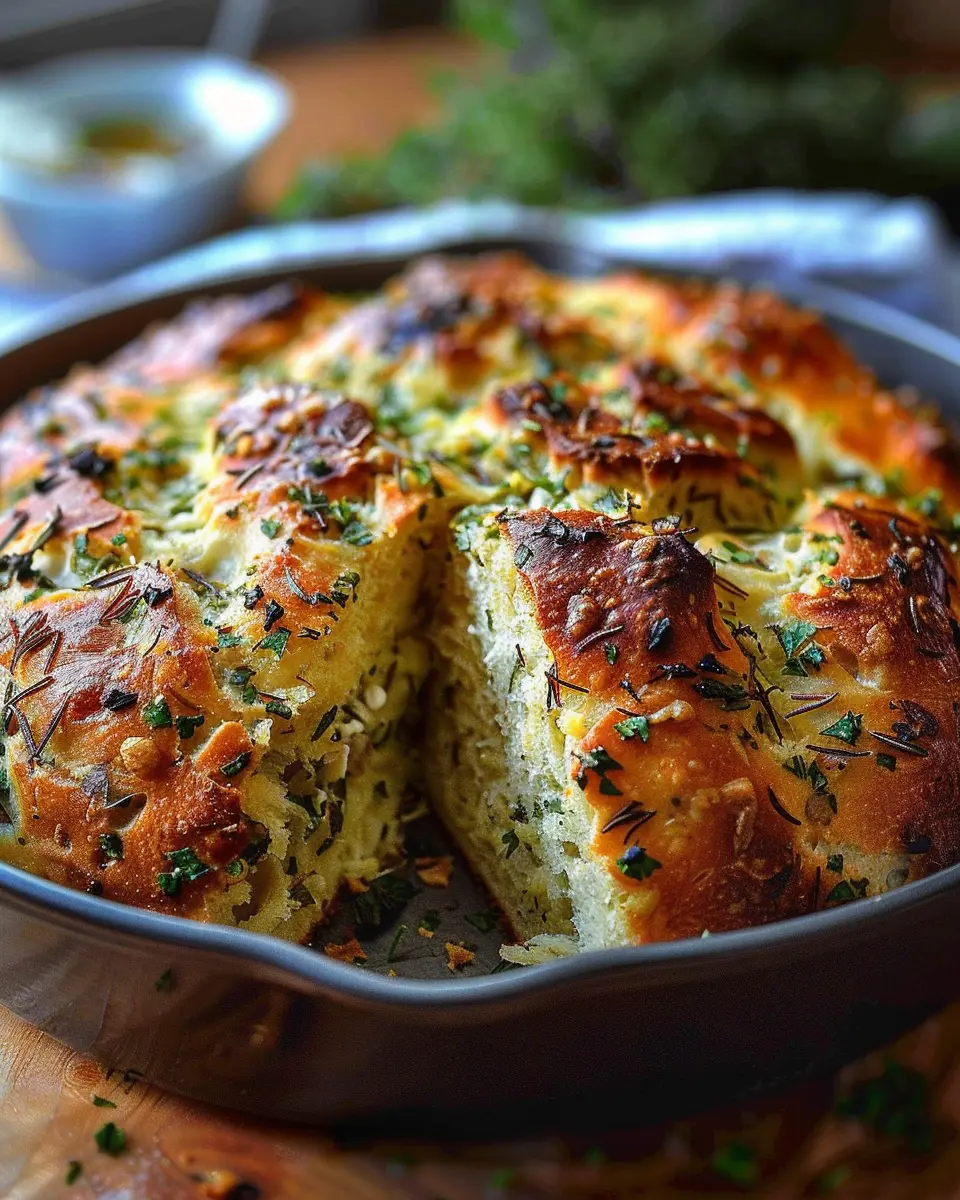
Bake to Golden Perfection (and Create That Steam!)
Carefully remove the hot Dutch oven from the oven. Lift the parchment with your dough and place it inside the pot. Cover with the lid and bake for 30 minutes. After this initial time, remove the lid and bake for an additional 15-20 minutes, or until the bread is beautifully golden brown.
Cooling Down – Why It Matters
After baking, be patient! Carefully remove the bread and place it on a wire rack to cool for about 30 minutes. Cutting into hot bread can ruin its texture, so let it rest. This cooling period allows the crumb to set, ensuring a delightful bread experience when you finally slice in.
Now that you’ve prepared your garlic herb Dutch oven bread, why not serve it alongside a delicious soup or with some olive oil for dipping? It’s perfect for any occasion or just to enjoy at home. Happy baking!
Variations on Garlic Herb Dutch Oven Bread
When you master the basic garlic herb Dutch oven bread, the fun doesn’t just stop there! You can experiment with various flavors to create a unique twist tailored to your taste. Here are a few delightful variations you can easily make.
Add cheese for an indulgent twist
Who doesn’t love a cheesy bread? Incorporating your favorite cheese can elevate your garlic herb Dutch oven bread to new heights. Think gooey mozzarella, robust cheddar, or even creamy goat cheese. Just fold in about a cup of shredded cheese into your dough before the second rise. For an added burst of flavor, consider mixing in garlic-infused cheese or crumbled feta!
Experiment with different herbs and spices
While garlic and herbs are a classic combination, don’t feel limited to just those! Fresh rosemary, thyme, or oregano can give your bread a distinct flavor profile. Alternatively, experiment with spices like red pepper flakes for a hint of heat or smoked paprika for a deep, rich taste. You might even try adding some freshly grated lemon zest for a refreshing citrus touch.
Make it a savory loaf with sun-dried tomatoes
Transform your loaf into something truly special by folding in chopped sun-dried tomatoes. Their intense flavor pairs wonderfully with the garlic, enhancing the overall taste. Not only does this variation add depth, but it also infuses the bread with a beautiful color. You might find that you can’t resist nibbling on this savory delight on its own!
These variations are just the beginning. The beauty of garlic herb Dutch oven bread lies in its versatility, inviting you to get creative! For more tips on baking bread, consider checking out resources like King Arthur Baking or BBC Good Food, where you’ll find a wealth of inspiration. Happy baking!
Cooking tips and notes for Garlic Herb Dutch Oven Bread
The importance of temperature and resting time
When making garlic herb dutch oven bread, temperature and resting time are crucial. Start by ensuring your water is warm, ideally between 100-110°F (37-43°C), to activate the yeast effectively. Too hot? You might kill it; too cold? It’ll take ages to rise.
After mixing your dough, let it rest. A longer resting time allows gluten to develop, resulting in a chewier texture. Aim for at least an hour at room temperature. If you can, let the dough ferment overnight in the fridge. This enhances the flavor significantly!
How to achieve that ideal crust
The crust of garlic herb dutch oven bread is what makes it truly irresistible. To achieve that golden, crispy exterior, use a preheated Dutch oven. This retains moisture during baking, mimicking a professional steam-injected oven.
For extra crunch, consider sprinkling water in the oven just before closing the lid. Also, avoid lifting the lid too frequently while baking; this keeps the steam in, developing that desirable crust. Want to elevate your bread game? Check out resources like King Arthur Baking for more tips on bread making!
Serving suggestions for Garlic Herb Dutch Oven Bread
Pair it with soups and stews
One of the best ways to enjoy garlic herb Dutch oven bread is by pairing it with your favorite soups and stews. The crusty exterior and soft interior make it perfect for soaking up rich broths. Consider serving this delightful bread alongside classic options like tomato basil soup or a hearty beef stew. These combinations not only elevate your meal but also create a warm and comforting atmosphere at the dinner table. If you’re looking for a recipe to try, check out these soup ideas that would pair beautifully with your homemade bread!
Enjoy it fresh with olive oil and balsamic vinegar
For a more casual yet equally satisfying experience, slice your garlic herb Dutch oven bread fresh from the oven and serve it with a drizzle of high-quality olive oil and a splash of balsamic vinegar. This Italian-inspired treat is simple yet elegant; the robust flavors of the garlic and herbs complement the richness of the olive oil, offering a delightful appetizer or side. You can even jazz it up by adding a sprinkle of sea salt or fresh herbs on top to enhance the experience. Looking for the perfect olive oil? Here’s a list of recommended quality oils that can take your bread experience to the next level!
By experimenting with these serving ideas, you’ll discover just how versatile your garlic herb Dutch oven bread can be!
Time Breakdown for Garlic Herb Dutch Oven Bread
When it comes to making garlic herb dutch oven bread, knowing how long everything will take makes the process that much smoother. Here’s a handy breakdown to keep you on track.
Preparation Time
Preparing your ingredients and the dough takes approximately 15 minutes. This includes measuring out the flour, herbs, and other essentials, along with some kneading to get that perfect consistency.
Cooking Time
The oven needs about 30 minutes to work its magic. You’ll want that beautiful golden crust to develop, which is one of the hallmarks of this delicious bread.
Total Time
From start to finish, you’re looking at roughly 45 minutes for this delightful garlic herb dutch oven bread. Quick, isn’t it? Perfect for pairing with a meal or enjoying on its own with some butter.
By managing your time effectively, you’ll find it easy to whip up this scrumptious bread. For more tips on baking like a pro, check out resources from King Arthur Baking or The Kitchn. Happy baking!
Nutritional facts for Garlic Herb Dutch Oven Bread
When you indulge in homemade Garlic Herb Dutch Oven Bread, knowing its nutritional profile can enhance your enjoyment. Here’s a quick look at what you’re getting in each slice.
Calories per slice
Each slice of this delectable bread contains approximately 150 calories. It’s a wholesome treat that fits well into your meals or as a savory snack, especially when paired with a light soup or salad.
Breakdown of carbs, protein, and fats
In terms of macronutrients, the nutritional breakdown is as follows:
- Carbohydrates: About 30 grams, providing essential energy for your day.
- Protein: Approximately 4 grams, supporting muscle repair and growth.
- Fats: Around 2.5 grams, mostly from olive oil or butter, which adds flavor and richness.
This garlic herb dutch oven bread not only tastes great but also brings a balanced bit of nutrition to the table. If you’re interested in further nutritional insights, websites like Healthline offer comprehensive data on various food items. Happy baking!
FAQs about Garlic Herb Dutch Oven Bread
Can I use whole wheat flour instead of all-purpose?
Absolutely! You can substitute whole wheat flour for all-purpose flour in your garlic herb Dutch oven bread, but keep in mind that your loaf might be denser. To achieve a fluffier texture, consider using a mixture of whole wheat and all-purpose flour, or try adding a bit more water to the dough. This flour swap also means you’re getting extra nutrients, making each slice a bit healthier. If you’re curious about the benefits of whole grains, check out this article on Whole Grains.
How long does the bread stay fresh?
Freshly baked garlic herb Dutch oven bread typically lasts for about 2 to 3 days at room temperature. Of course, that’s if you can resist devouring it all at once! To make sure it stays fresh longer, store it in a paper bag instead of plastic, which can cause it to get soggy. If you want to extend its shelf life even further, consider freezing it.
How can I store leftovers properly?
Leftovers can be a lifesaver on busy weekdays! To keep your garlic herb Dutch oven bread fresh, let it cool completely before slicing. Then, wrap it tightly in plastic wrap or aluminum foil, or use a bread box if you have one. For longer storage, you can also slice the bread and freeze it. This way, you can enjoy a piece whenever the craving strikes! For tips on the best freezing techniques, head over to The Kitchn.
With these tips, you’ll be well-equipped to whip up and enjoy your garlic herb Dutch oven bread time and again! Happy baking!
Conclusion on Garlic Herb Dutch Oven Bread
Your new favorite recipe for homemade bread
If you’re searching for a delicious, easy-to-make addition to your home-cooked meals, look no further than this garlic herb Dutch oven bread. The crusty exterior and soft, flavorful interior make it a perfect partner for soups, salads, or even just a drizzle of olive oil.
Making bread at home offers so much satisfaction, don’t you think? Plus, it’s a fantastic way to impress friends during a casual dinner. Whether you’re a seasoned baker or a novice, this recipe is simple enough for anyone to master.
So, roll up your sleeves and embrace the aroma of freshly baked bread—your kitchen will thank you!
For more tips on bread-making, you might enjoy visiting resources like King Arthur Baking and Breadtopia for additional insights.
PrintGarlic Herb Dutch Oven Bread: The Best Homemade Delight
Experience the comforting aroma and taste of homemade Garlic Herb Dutch Oven Bread, a perfect addition to any meal.
- Prep Time: 15 minutes
- Cook Time: 45 minutes
- Total Time: 12 hours
- Yield: 1 loaf 1x
- Category: Bread
- Method: Baking
- Cuisine: American
- Diet: Vegetarian
Ingredients
- 3 cups all-purpose flour
- 1 and 1/2 teaspoons salt
- 1/4 teaspoon active dry yeast
- 1 and 1/2 cups warm water
- 2 tablespoons olive oil
- 3 cloves garlic, minced
- 1 tablespoon fresh rosemary, chopped
- 1 tablespoon fresh thyme, chopped
Instructions
- In a large bowl, mix the flour, salt, and yeast together.
- Add the warm water, olive oil, garlic, rosemary, and thyme. Stir until a dough forms.
- Cover the bowl with a kitchen towel and let it sit for 12-18 hours at room temperature.
- Once risen, preheat the oven to 450°F (230°C) with a Dutch oven inside.
- Carefully remove the hot Dutch oven, and place the dough inside. Cover and bake for 30 minutes.
- Remove the lid and bake for an additional 15-20 minutes until golden brown.
- Let the bread cool before slicing and serving.
Notes
- Experiment with different herbs to suit your taste.
- This bread is best served fresh but can be toasted later for an added crunch.
Nutrition
- Serving Size: 1 slice
- Calories: 150
- Sugar: 0.5g
- Sodium: 320mg
- Fat: 4g
- Saturated Fat: 0.5g
- Unsaturated Fat: 3.5g
- Trans Fat: 0g
- Carbohydrates: 28g
- Fiber: 1g
- Protein: 4g
- Cholesterol: 0mg
Keywords: Garlic Herb Dutch Oven Bread, homemade bread, easy bread recipe