Introduction to Cookie Butter Icebox Cake
If you’re a fan of quick and easy desserts that pack a serious flavor punch, then you need to know about the cookie butter icebox cake. This creative dessert takes the rich, spiced flavor of cookie butter—a delicious spread made from crushed cookies and spices— and transforms it into a no-bake marvel that’s as delightful to eat as it is to make.
Why cookie butter is the ultimate dessert ingredient
Cookie butter has rapidly gained popularity as the ultimate dessert ingredient for many reasons. Firstly, its unique combination of sweetness and warm spice makes it ideal for complementing a variety of flavors, whether in cakes, cookies, or even just on toast. The luscious texture is simply irresistible, and it mimics the essence of desserts without requiring a lot of effort to achieve that star quality.
Did you know that according to a study by the International Culinary Center, 80% of chefs believe flavor innovation is key to successful menus? Cookie butter fits this bill perfectly, as it allows you to be creative in your dessert making. Think of all the ways you can incorporate it—from drizzling on top of your morning pancakes to swirling into freshly made ice cream. The versatility is endless!
In a cookie butter icebox cake, this spread shines by bringing together layers of creamy goodness and crunchy texture. It complements biscuits—often used in these cakes—creating an inviting contrast. As you layer your ingredients, you’ll find that it’s not just about the taste; the visual of alternating layers of cookie, cream, and, of course, cookie butter is a feast for the eyes!
Moreover, making an icebox cake is a brilliant way to save time. With no baking required, you can whip this dessert up in a matter of minutes and let the refrigerator do the magic. So, if you’re looking for a quick treat to impress your friends or to wind down after a long week, this cookie butter icebox cake is your answer!
For those interested in exploring the world of cookie butter or looking for quality products, check out suppliers like Trader Joe’s or Amazon, where you can find a variety of options. Happy baking!
Ingredients for Cookie Butter Icebox Cake
Essential ingredients for the icebox cake
To whip up a delightful cookie butter icebox cake, you’ll need just a handful of key ingredients that make this dessert a creamy, dreamy treat. Here’s what you should gather:
- Cookie Butter: The star of the show! Look for a high-quality brand for a rich flavor.
- Mascarpone Cheese: This adds a luscious, creamy texture that pairs perfectly with the cookie butter.
- Heavy Whipping Cream: Whipping this to soft peaks will give your cake stability and lightness.
- Graham Crackers: A classic base that adds crunch and sweetness, providing the right contrast to the creamy layers.
- Powdered Sugar: For a touch of sweetness, helping to balance the flavors nicely.
Optional toppings and mix-ins to enhance flavor
To elevate your cookie butter icebox cake, consider these fun toppings and mix-ins:
- Chopped nuts: Walnuts or pecans add a delightful crunch.
- Chocolate chips: For those who love a little extra sweetness.
- Caramel drizzle: A sweet finishing touch that pairs beautifully with cookie butter.
- Fresh fruits: Slices of banana or berries can add freshness and color.
By mixing and matching these additions, you can create a personalized dessert that will impress your friends and family. Happy baking! For more tips on mastering icebox cakes, check out this guide from the Food Network for additional inspiration.
Preparing Cookie Butter Icebox Cake
Creating a delightful cookie butter icebox cake at home is easier than you might think. Perfect for gatherings or simply indulging on a cozy evening, this cake melds creamy textures and bursting flavors that will leave everyone raving. Let’s walk through the process step-by-step to ensure your cake turns out splendidly.
Gather Your Equipment
Before diving into the deliciousness, it’s essential to organize your kitchen space. Here’s what you’ll need:
- Mixing Bowls: Two large mixing bowls for whipping and mixing.
- Electric Mixer: A hand or stand mixer makes whipping heavy cream a breeze; however, a whisk can work if you’re up for a workout!
- Spatula: For folding ingredients together and scraping the bowl.
- 9×13-inch Baking Dish: This will hold all those lovely layers.
- Plastic Wrap: To cover your cake while it chills.
- Measuring Cups and Spoons: Accurate measurements lead to a perfect cake.
Having these tools ready will streamline your process, letting you focus on that irresistible flavor.
Whip the Heavy Cream
The key component of any cookie butter icebox cake is the luscious whipped cream. Start by pouring 2 cups of heavy cream into a mixing bowl. Using your electric mixer, whip the cream on medium-high speed until it reaches soft peaks. This usually takes about 3 to 5 minutes.
- Tip: For perfectly whipped cream, make sure your bowl and beaters are chilled beforehand. This helps the cream whip faster and hold its shape.
As you whip, consider how heavy cream combines essential fats with air to provide that heavenly texture. Recommended resources like Healthline go deeper into the nutritional aspects of cream if you’re interested.
Incorporate Cookie Butter and Cheese
Now, it’s time to add flavor! In another bowl, mix together 1 cup of your favorite cookie butter with 8 ounces of cream cheese until smooth. It’s up to you whether you use a mixer again or a spatula – either works! Once blended, gently fold in the whipped cream from the previous step.
The goal here is to create a fluffy, creamy mixture that embodies the warm, spiced flavors of cookie butter. If you’re feeling adventurous, a splash of vanilla extract can elevate your cake’s profile, adding depth to the sweet creaminess.
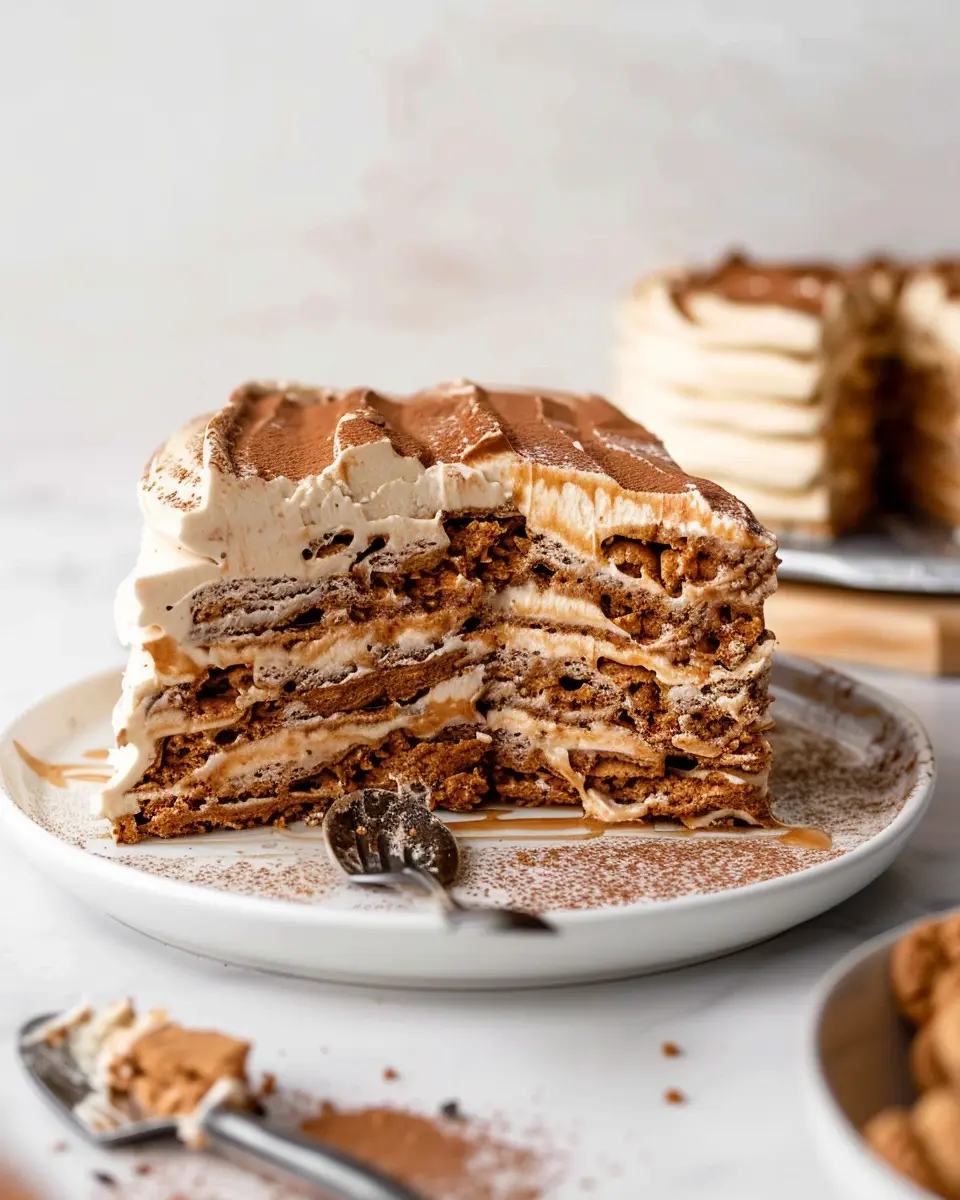
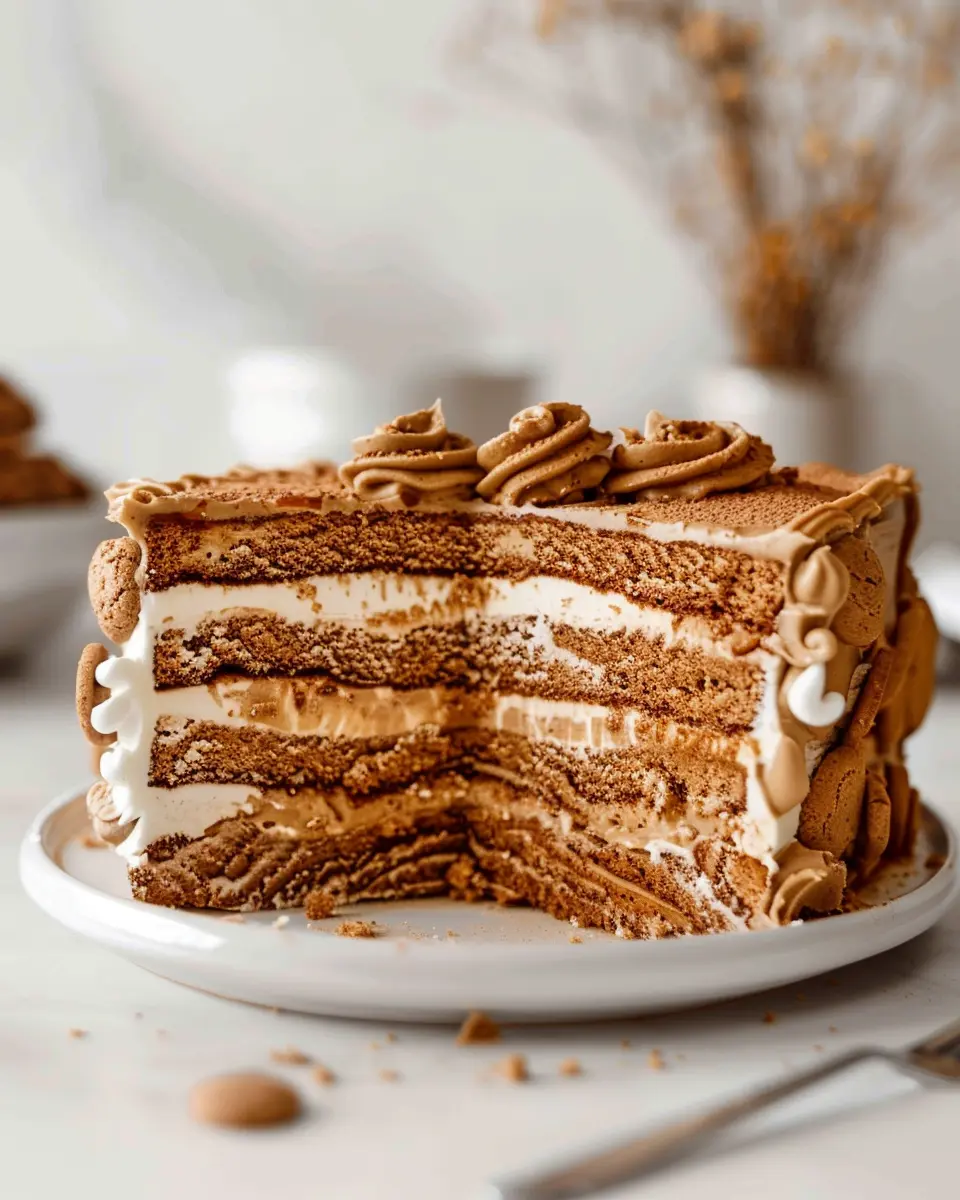
Assemble the Layers
This is where the magic happens! Start with a layer of the creamy mixture at the bottom of your prepared baking dish. Next, dip each graham cracker or chocolate wafer briefly in milk (about 1 second on each side) to soften them, then layer them over the cream.
- Layering tip: Alternate layers of the whipped cream mixture and dipped cookies, building a beautiful multi-layered cake. Aim for at least three layers to create that stunning icebox effect!
As you stack, remember: this cake is about balance. You want just enough cookie crunch to complement the creamy richness without overpowering it.
Chill and Set the Cake
Once assembled, it’s time for the waiting game. Cover your cake with plastic wrap and let it chill in the refrigerator for at least 4 hours, or ideally overnight. This chilling time allows the cookies to absorb moisture, transforming into a cake-like texture.
You might wonder why the waiting is crucial. The longer it sits, the more the flavors meld, resulting in a cake that’s far more than the sum of its parts. If you’re curious about the science of flavors melding, check out Serious Eats.
Once you’ve patiently waited, slice yourself a piece of this cookie butter icebox cake and dig in. With its blending of creamy, spicy, and sweet flavors, this cake will surely steal the show at your next gathering!

Variations on Cookie Butter Icebox Cake
Seasonal Variations with Fresh Fruits
When it comes to transforming your cookie butter icebox cake, adding fresh fruits can elevate the flavor profile and provide a delightful seasonal twist. Imagine layering ripe summer strawberries or juicy peaches between the cookie butter-infused layers—these fruits not only enhance visual appeal but also bring a refreshing contrast to the creamy texture. If you’re feeling adventurous, try incorporating autumn apples or winter citrus, such as mandarin oranges, for a seasonal flair. According to research, flavors paired with fruits can significantly impact our sensory experience, so don’t hesitate to experiment!
Nutty Twists with Different Spreads
Feeling a little adventurous? Consider enhancing your cookie butter icebox cake with different nutty spreads. Almond butter adds a delightful creaminess and a hint of nuttiness, while hazelnut spread offers a decadent, chocolaty undertone. You might even try mixing your cookie butter with a spoonful of peanut butter for a crunchy twist. The great thing about icebox cakes is that they’re incredibly forgiving, and you can adjust your cookie butter ratios to find the perfect balance for your taste buds. If you’re interested in alternative spreads, check out some ideas on the Nut Butter Guide to inspire your culinary creativity.
Ultimately, whether you stick with the classic recipe or embrace these variations, you’ll be preparing a dessert that’s bound to impress! Have these ideas sparked any tasty inspirations for your next gathering? It’s all about making the cookie butter icebox cake your own!
Cooking Tips and Notes for Cookie Butter Icebox Cake
Ensuring the Right Cream Consistency
Getting your cream consistency just right is crucial for a successful cookie butter icebox cake. Start by chilling your mixing bowl and beaters beforehand; this ensures the cream will whip to soft peaks effortlessly. Use heavy whipping cream and beat until it holds firm peaks—this helps your cake stay light yet stable. If you accidentally over-whip and it looks grainy, gently fold in a bit more unwhipped cream to smooth it out. It’s all about achieving that dreamy texture!
Tips for Easier Assembly
When it comes to assembling your cookie butter icebox cake, think about your approach. Using a springform pan can make removal a breeze, while lining the bottom with parchment paper helps keep everything intact. It’s all about layers, so dip your cookies in a mix of milk and vanilla for added flavor without becoming too soggy. Assemble in the fridge for several hours—allowing the layers to meld together beautifully makes a world of difference when serving. Trust me, your guests will love you for it!
For more tips on building delicious desserts, check out resources on baking techniques or the science behind chilling baked goods.

Serving suggestions for Cookie Butter Icebox Cake
Pairing with beverages for a complete experience
Enhancing your cookie butter icebox cake with the right beverages can take your dessert game to the next level. Consider serving it with a chilled glass of almond milk or a creamy vanilla bean latte. The nutty flavors of almond milk complement the sweetness of cookie butter beautifully, while coffee adds a delightful contrast that awakens your taste buds. If you’re in the mood for something fruity, a light and refreshing berry smoothie could also work wonders!
Creative plating ideas for special occasions
Presenting your cookie butter icebox cake with flair makes all the difference, especially for celebrations. Here are a few creative plating ideas to impress your guests:
- Layer with Chocolate Drizzle: Drizzle melted dark chocolate over each slice for an elegant touch.
- Garnish with Fresh Berries: Add a sprinkle of fresh raspberries or blueberries to enhance both flavor and color.
- Serve with Whipped Cream: A dollop of freshly whipped cream on the side elevates the experience.
These simple yet effective ideas will leave a lasting impression! For more about dessert plating techniques, check out resources from the National Culinary Institute.
Time breakdown for Cookie Butter Icebox Cake
When it comes to whipping up a delightful cookie butter icebox cake, time management is key. Below, you’ll find a straightforward breakdown of the time you’ll spend on this indulgent, no-bake treat.
Preparation time
You’ll need about 20-25 minutes to prepare the ingredients. This includes gathering your essentials like cookie butter, whipped cream, and your favorite cookies—think chocolate for an extra dessert twist.
Inactive chilling time
The real magic happens in about 4-6 hours in the fridge, allowing the flavors to meld beautifully and the cake to set perfectly. If you can, prepare it the evening before, giving it an overnight chill.
Total time
Overall, you’re looking at roughly 4-6 hours and 25 minutes. It’s well worth it for a dessert that’s sure to impress! For more insight on chilling times and ingredient flavors, check out this comprehensive guide on important dessert techniques.
Preparing a cookie butter icebox cake is not only a treat for the taste buds but also a delightful way to spend a lazy afternoon. Happy baking!
Nutritional facts for Cookie Butter Icebox Cake
Calories and key nutritional components
When indulging in a delicious cookie butter icebox cake, it’s essential to be aware of the nutritional profile. Typically, a serving contains around 350-400 calories, primarily from the cookie butter and cream cheese layers. You’ll also find a good amount of fats, primarily saturated, due to the creamy ingredients. This dessert isn’t rich in protein, but it’s a perfect treat for special occasions or when you’re craving something sweet. If you’re interested in a more detailed breakdown of the nutritional content, websites like MyFitnessPal offer great tools for tracking your meals.
Suggested portion sizes
When enjoying your cookie butter icebox cake, moderation is key. A typical portion size is about 1/12 of the cake, which allows you to savor the flavors without going overboard. If you’re sharing with friends or celebrating a special occasion, consider cutting smaller pieces. This way, you can enjoy the delightful taste while keeping your dietary goals in check! Balancing treats with wholesome meals makes it easier to indulge without guilt.
Remember, this cake is all about joy and indulgence, so allow yourself a slice every now and then!
FAQs about Cookie Butter Icebox Cake
Can I make this cake ahead of time?
Absolutely! One of the best aspects of a cookie butter icebox cake is its convenience. You can prepare it a day or two in advance. Just remember to give it enough time to set in the fridge—ideally, overnight works wonders. This also allows the flavors to meld beautifully, making every bite even more delicious.
What if I can’t find Lotus Biscoff cookies?
No worries if you can’t locate Lotus Biscoff cookies! You can easily substitute them with similar options. Consider using speculoos cookies or even ginger snap cookies for that delightful spice and crunch. If you’re feeling adventurous, homemade cookies can add a personal touch. Check out some great recipes here for making your own!
How should I store leftovers?
If you find yourself with leftovers (which is a rare occurrence with this treat!), store your cookie butter icebox cake in an airtight container in the fridge. It typically stays good for about 3-4 days. You can also freeze individual slices if you want to extend the life even further. Just wrap them well in plastic wrap and place them in a freezer-safe container. When you’re ready to indulge again, thaw in the fridge for a few hours—just like new!
Remember, the best part of this cake is how forgiving it is. So feel free to experiment and make it your own! If you have any other questions, don’t hesitate to reach out. Sharing tips and tricks is what makes this culinary journey enjoyable.
Conclusion on Cookie Butter Icebox Cake
Recap of Why This Dessert is a Must-Try
If you haven’t yet indulged in the cookie butter icebox cake, you’re in for a delightful treat. This decadent dessert layers creamy cookie butter with fluffy whipped cream and crunchy cookies, creating a symphony of textures and flavors that’s hard to resist. It’s a no-bake recipe that’s perfect for warm days or whenever you want to impress guests without spending hours in the kitchen.
Why is it a must-try?
- Ease of Preparation: Quick assembly with minimal ingredients.
- Unique Flavor: The cookie butter adds a warm, spiced richness.
- Versatile: Perfect for parties, potlucks, or a cozy night in.
So, grab your ingredients and get ready to whip up this tasty confection—your taste buds will certainly thank you! For more inspiration, check out Bon Appétit or Food Network for other delicious dessert ideas.
PrintCookie Butter Icebox Cake: Easy Indulgence for Any Occasion
A delicious and easy dessert, the Cookie Butter Icebox Cake is perfect for any occasion.
- Prep Time: 20 minutes
- Cook Time: 0 minutes
- Total Time: 4 hours 20 minutes
- Yield: 8 servings 1x
- Category: Dessert
- Method: No bake
- Cuisine: American
- Diet: Vegetarian
Ingredients
- 1 cup cookie butter
- 2 cups whipped cream
- 1 package graham crackers
- 1/2 cup crushed cookies for topping
Instructions
- In a mixing bowl, combine cookie butter and whipped cream until smooth.
- Layer graham crackers at the bottom of a serving dish.
- Spread a layer of the cookie butter mixture over the graham crackers.
- Add another layer of graham crackers and repeat until all ingredients are used.
- Top with crushed cookies and refrigerate for at least 4 hours before serving.
Notes
- This cake can be made a day in advance for better flavor.
- Feel free to add chocolate chips for an extra treat.
Nutrition
- Serving Size: 1 slice
- Calories: 350
- Sugar: 20g
- Sodium: 150mg
- Fat: 25g
- Saturated Fat: 15g
- Unsaturated Fat: 8g
- Trans Fat: 0g
- Carbohydrates: 30g
- Fiber: 1g
- Protein: 5g
- Cholesterol: 30mg
Keywords: cookie butter, icebox cake, dessert, easy recipes