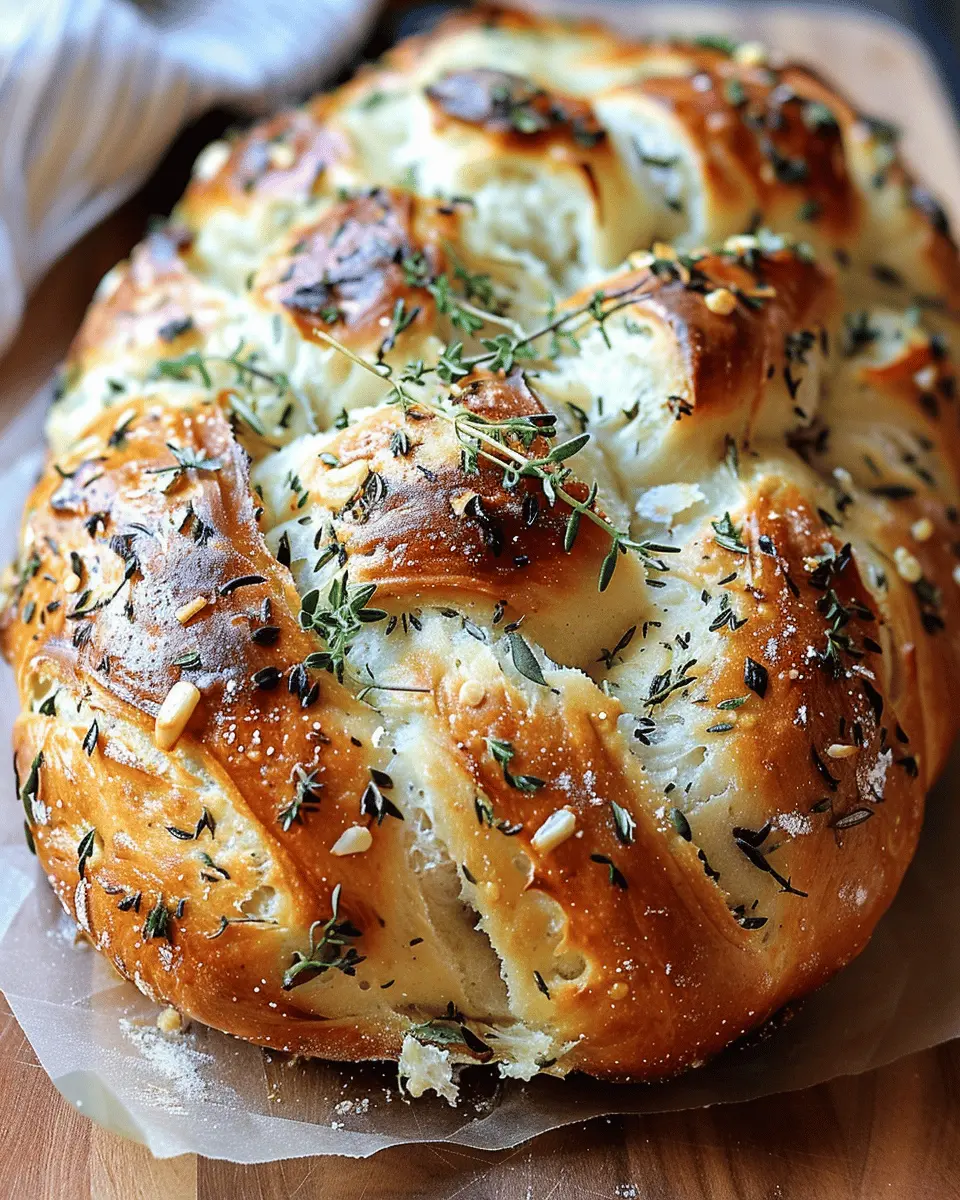
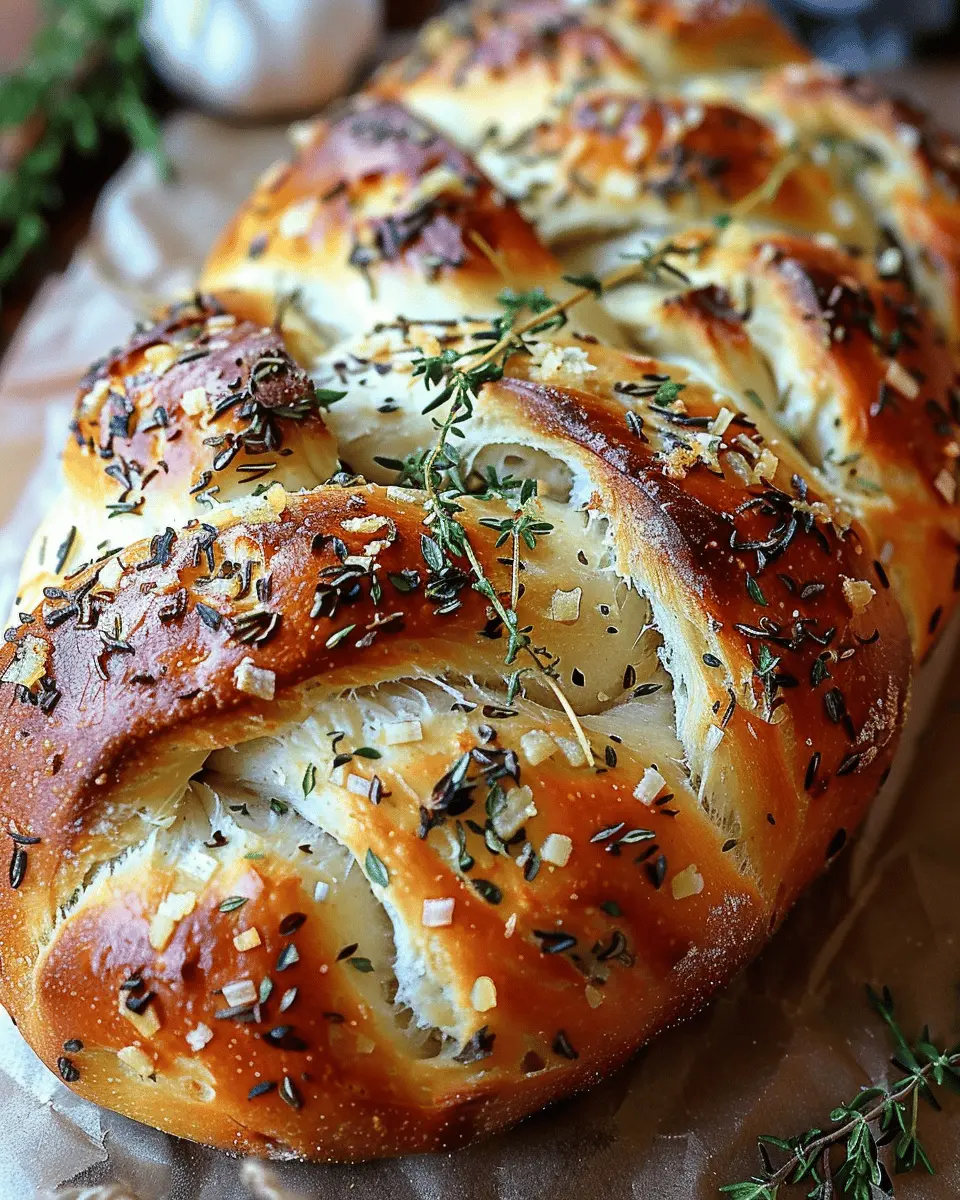
Introduction to Garlic Herb Braided Bread
When it comes to baking, few things can rival the allure of freshly made bread—especially when it’s as delightful and aromatic as garlic herb braided bread. This bread is more than just a side dish; it’s a culinary experience that brings the warmth of home and comfort to any meal. Imagine the enticing aroma of garlic mingling with a medley of herbs, creating a tantalizing scent that fills your kitchen and makes your mouth water.
What makes Garlic Herb Braided Bread a must-try?
So, what sets garlic herb braided bread apart from your everyday loaf? For starters, it’s not just about taste—it’s about texture, presentation, and a whole lot of love that goes into every braid. The process of braiding dough not only looks impressive, but it also helps combine flavors more evenly while ensuring a soft, fluffy interior. Plus, garlic packs a punch with its rich flavor profile, while fresh herbs like rosemary, thyme, and parsley elevate the dish to new heights. Not to mention, studies from the American Journal of Clinical Nutrition point out that herbs can enhance the nutritional value of your meals!
What brings this bread to the next level is its versatility. Whether you’re pairing it with soups, salads, or simply enjoying it on its own, garlic herb braided bread complements a wide range of dishes. Another bonus? It makes for an excellent centerpiece at gatherings, making it perfect for both casual get-togethers and more formal events.
If you’re entertaining guests or planning a cozy night in, think about whipping up this fabulous bread. Not only will your home smell heavenly, but your friends and family will be in awe of your baking prowess. Ready to give it a try? You’ll find that the time spent kneading, braiding, and baking is well worth it when you take that first warm bite.
As you prepare to embark on this baking adventure, don’t forget to explore different herb combinations or let your creativity shine with toppings. The possibilities truly are endless!
Ingredients for Garlic Herb Braided Bread
Creating a delicious garlic herb braided bread is not only an art but also a science. Having the right ingredients on hand is crucial for that perfect blend of flavors and textures. Here’s what you’ll need:
- 3 to 4 cups all-purpose flour: A staple for the perfect bread base. More flour allows for a fluffier texture.
- 1 packet active dry yeast (about 2¼ teaspoons): This is the magic ingredient that will make your bread rise.
- 1 cup warm water (100°F to 110°F): Helps activate the yeast; too hot and it’ll die, too cold and it won’t work.
- 2 tablespoons sugar: Adds a hint of sweetness while helping to fuel the yeast.
- 1 tablespoon salt: Essential for flavor; don’t skip this!
- ¼ cup olive oil: Gives the bread a rich, savory taste.
- 2 tablespoons minced garlic: The star of the show! Infuses your bread with that irresistible flavor.
- Fresh herbs (like rosemary and thyme): Provides a burst of freshness and elevates your garlic herb braided bread to culinary bliss.
Gather these ingredients, and you’ll be ready to impress your friends and family with homemade goodness. For more tips on choosing quality ingredients, check out resources from Food Network and The Kitchn. Happy baking!
Preparing Garlic Herb Braided Bread
Making homemade garlic herb braided bread can seem daunting at first, but it’s a rewarding endeavor that fills your kitchen with delicious aromas and creates a delightful treat for any occasion. Grab your apron and let’s dive into the steps you’ll need to take to make this mouthwatering bread!
Activate the yeast
The first step in creating your garlic herb braided bread is to activate your yeast. Nothing is more satisfying than watching the yeast foam up as it combines with warm water. Here’s what you’ll need to do:
- Ingredients: 1 packet (2 ¼ teaspoons) of active dry yeast, 1 cup of warm water (110°F or about 45°C), and a pinch of sugar.
- Start by mixing the sugar and yeast in a bowl with warm water. Let this sit for about 5-10 minutes or until it becomes frothy. This indicates that your yeast is active and ready to work its magic in your dough.
Combine the ingredients
Once your yeast is bubbly, it’s time to combine the ingredients for the bread. In a large mixing bowl, you’ll want to bring together:
- 3-4 cups of all-purpose flour
- 1 teaspoon kosher salt
- 3 tablespoons of olive oil
- 2-3 cloves of minced garlic
- Fresh or dried herbs of your choice (like rosemary, thyme, or parsley)
Mix the flour and salt in a separate bowl and create a well in the center. Pour in your activated yeast mix and add the olive oil. Then, gradually incorporate the flour until combined. Need ideas for herbs? Check out this guide on herbs for bread that can elevate your baking game.
Knead the dough
After you have combined your ingredients, it’s time to get your hands a bit messy! On a floured surface, knead the dough for about 8-10 minutes. You should aim for a smooth, elastic texture. Not sure if you’re kneading correctly? A good rule of thumb is to press, fold, and turn the dough continuously.
Let the dough rise
Once your dough is perfectly kneaded, place it in a lightly oiled bowl and cover it with a damp cloth. Leave it in a warm spot to rise until it has doubled in size—this usually takes about 1-2 hours. A great trick to speed this up is to place it in an oven set to its lowest heat, then turn it off. Creating a warm environment encourages your dough to rise faster.
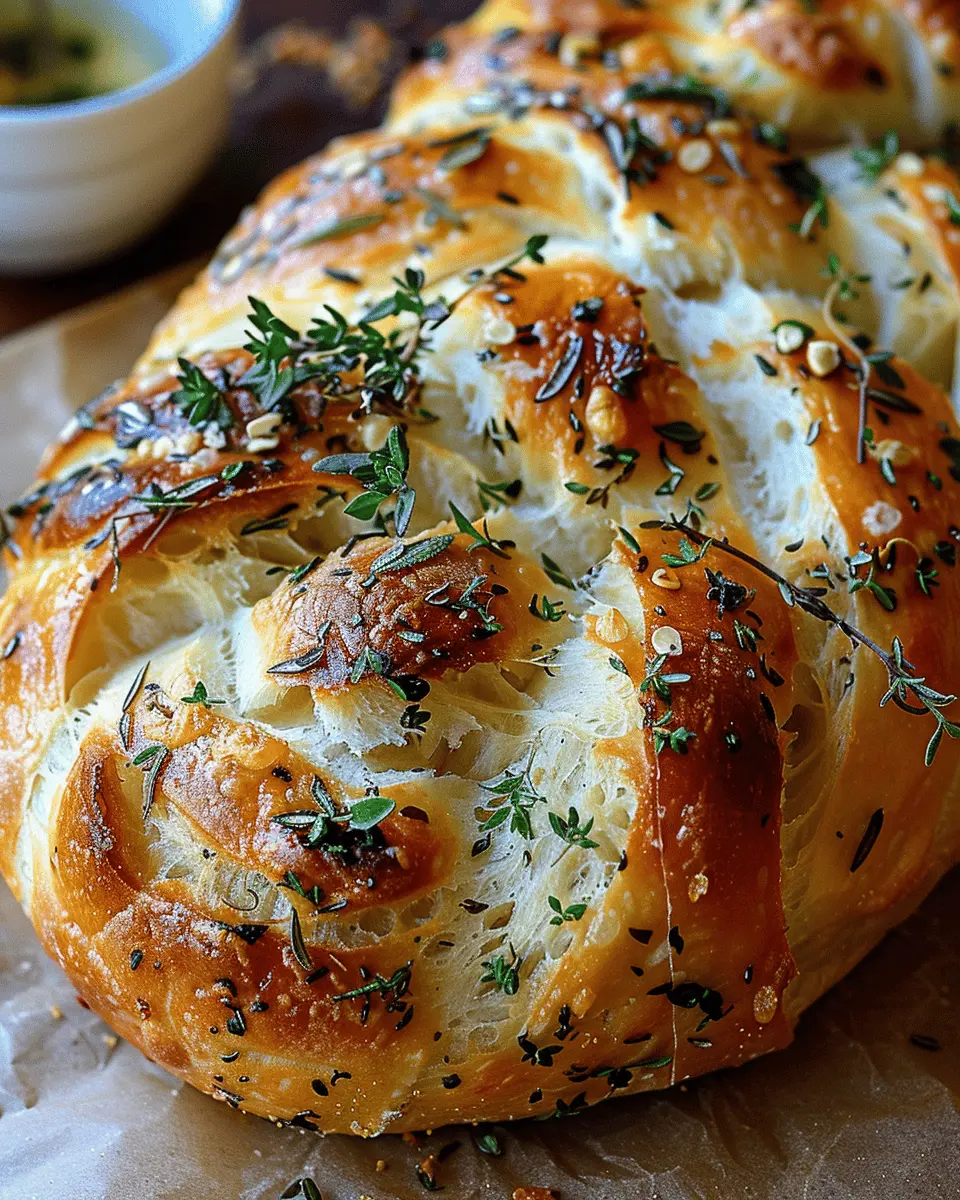
Shape the braid
Now that your dough has risen beautifully, it’s time to shape it into a braid. Punch down the dough to release the air and divide it into three equal portions. Roll each portion into long strands about 12 inches long. Then, simply braid these strands together, tucking the ends under. You might even turn on some music to set the mood; after all, food and fun go hand in hand!
Second rise
After shaping the braid, place it on a baking sheet lined with parchment paper. Cover it again with a cloth and let it rise for another 30-45 minutes. This second rise will give your garlic herb braided bread its lovely fluffy texture.
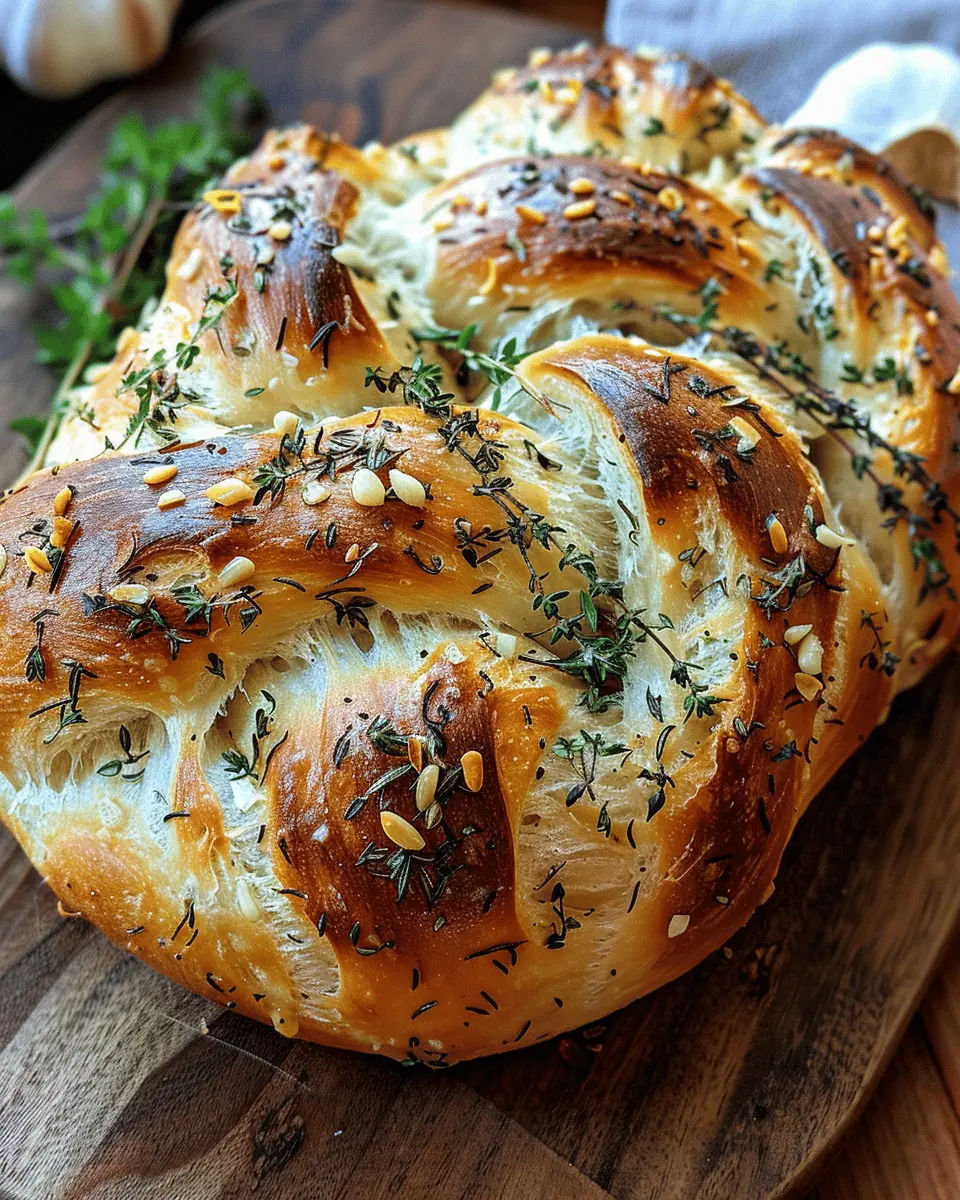
Bake the bread
Finally, preheat your oven to 375°F (190°C). Before placing your bread in the oven, consider brushing it with some melted butter and sprinkling a little sea salt on top to enhance the flavors. Bake for about 25-30 minutes, or until the bread is golden brown. Your kitchen will be filled with mouthwatering aromas; it’s hard to resist sneaking a taste!
Once it’s baked, allow your garlic herb braided bread to cool. This bread is perfect with some olive oil for dipping or alongside your favorite soup. So, what are you waiting for? Enjoy the fruits of your labor!
Variations on Garlic Herb Braided Bread
When it comes to garlic herb braided bread, the sky’s the limit with how you can customize it to suit your tastes. Here are a couple of variations that add an exciting twist!
Adding cheese for extra flavor
Cheese lovers, rejoice! Incorporating cheese into your garlic herb braided bread can elevate your culinary experience. Try mixing in your favorite cheese like mozzarella, gouda, or even a sharp cheddar. Simply fold in shredded cheese into the dough before braiding, or for a gooey effect, stuff the bread with cheese before sealing the braid. This not only fills the bread with delicious flavor but also gives it an incredible stringiness that’s hard to resist. Did you know that according to the USDA, cheese is a great source of calcium and protein? Plus, the creaminess perfectly balances the robust flavor of garlic and herbs.
Incorporating different herbs
While the classic garlic and herb combination is a fantastic choice, switching it up with different herbs can bring a whole new profile to your garlic herb braided bread. Consider using rosemary for a woodsy note, or fresh basil for a hint of sweetness. Thyme and oregano are also brilliant options that complement garlic beautifully. If you’re feeling adventurous, you might try blending in some spicy red pepper flakes for a kick. Anchoring your bread in the flavors you love not only makes the recipe better tailored to your palate but also gives you the chance to experiment.
Want to explore more about herbs and spices? Check out this herbs and spices guide to unlock all the amazing benefits they offer!
With these variations, your garlic herb braided bread will never be boring, whether as a side dish or an appetizer!
Baking Notes for Garlic Herb Braided Bread
Baking the perfect garlic herb braided bread can elevate any meal, bringing warmth and a touch of homemade goodness to your table. Here are some essential tips to ensure your bread turns out perfectly every time.
Tips for Achieving the Perfect Texture
-
Kneading Properly: Ensure you’ve kneaded your dough enough. A well-kneaded dough should be smooth and elastic. This development of gluten is essential for that wonderful texture. Aim for about 10 minutes of kneading.
-
Hydration: The right balance of water is key. If your dough feels too dry, add a teaspoon of water at a time until it reaches a pliable consistency. Remember, humidity can affect your baking, so adjust accordingly!
-
Proofing Time: Don’t rush the proofing stage. Allow the dough to double in size, which usually takes around an hour. This is where the flavors of your garlic herb braided bread truly develop.
-
High-Quality Ingredients: Use fresh herbs and quality garlic for the best flavor. Not only will this enhance taste, but the aromas will fill your kitchen with irresistible scents.
For further insights, you might want to check out resources on baking techniques from sites like the King Arthur Baking Company or The Bread Bakers Guild. Happy baking!
Serving suggestions for Garlic Herb Braided Bread
Garlic herb braided bread is not just a delight on its own; it pairs beautifully with various dishes. Let’s explore some serving suggestions that will elevate your mealtime experience.
Pairing with soups and salads
Imagine a warm, hearty bowl of tomato basil soup complemented by the beautiful twists of your garlic herb braided bread. The flavors meld together, creating a satisfying comfort meal. For a lighter option, serve it alongside a fresh garden salad, drizzled with olive oil and balsamic vinegar. The bread’s herbal notes enhance the salad’s flavors wonderfully.
Enjoying with dips and spreads
You can also enjoy your garlic herb braided bread with an array of dips and spreads. Opt for a creamy spinach artichoke dip or a zesty hummus for an enticing appetizer. Simply tear off a piece of the bread and dip away! You might even consider making a quick herb cream cheese spread at home—it’s an effortless way to celebrate those garlicky flavors while impressing your guests.
If you’re in need of more ideas, check out The Spruce Eats for a variety of delicious dip recipes. Enjoy!
Tips for Making Perfect Garlic Herb Braided Bread
Creating a delicious garlic herb braided bread is all about technique and thoughtful ingredients. Here are some handy tips to ensure your bread is a showstopper at your next gathering.
Start with High-Quality Ingredients
The foundation of any great bread is the ingredients. Opt for fresh herbs like rosemary, thyme, and parsley. They elevate the flavor profile immensely. When it comes to flour, a good-quality bread flour will give your garlic herb braided bread the strength it needs to rise beautifully.
Don’t Rush the Rising
Patience is key in bread-making. Allow the dough ample time to rise until it has doubled in size. This could take anywhere from 1 to 2 hours, depending on the temperature and humidity. For a great resource on yeast and bread rising, check out King Arthur Baking’s guide.
Braiding Techniques Made Easy
When it comes to braiding, practice makes perfect. Divide your dough into three equal pieces and roll them out to the same length. Start by pinching the top to seal, then braid your pieces gently but firmly. If you’re unsure about the technique, there are numerous helpful videos online to guide you.
Flavor Infusion Tips
For that garlic kick, consider infusing your olive oil with crushed garlic and herbs before brushing it on the dough. This will ensure flavor bursts in every bite. Also, sprinkle some flaky sea salt on top before baking for an irresistible crunch.
With these tips, you’re well on your way to tasting that beautiful blend of flavors in your garlic herb braided bread. Enjoy the process and share it with others — they’ll be asking for seconds!
Time details for Garlic Herb Braided Bread
Preparation time
Making your own garlic herb braided bread is a rewarding experience that requires about 20 minutes of prep. This is when you’ll mix your ingredients and let the dough rise while you gather your favorite herbs and garlic flavors.
Baking time
Once it’s braided and beautifully shaped, it’ll bake for approximately 30–35 minutes. Keep an eye on it in those last few minutes to ensure a perfectly golden crust!
Total time
In total, you’re looking at around 1 hour and 15 minutes, including the rising time. So, if you’re planning a cozy dinner or a weekend brunch, this bread will be ready to knock everyone’s socks off in no time!
For more tips on bread making, check out King Arthur Baking for expert advice.
Nutritional information for Garlic Herb Braided Bread
When it comes to enjoying a slice of homemade Garlic Herb Braided Bread, knowing its nutritional benefits can enhance your culinary experience. Here’s a quick look at what you can expect in each serving:
Calories
Each serving of garlic herb braided bread packs around 150 to 180 calories. This makes it a delightful, indulgent treat without completely derailing your healthy eating goals.
Protein
With approximately 5 grams of protein per slice, this bread offers a modest protein boost, especially when paired with some protein-rich toppings like turkey bacon or chicken ham.
Sodium
Although flavorful, be mindful of the sodium content, which typically hovers around 250 to 300 mg per slice. If you’re watching your sodium intake, consider using low-sodium alternatives for the seasoning.
If you want to dive deeper into nutrition, tools like the USDA FoodData Central can be a great resource for more exact details. Remember, enjoying Garlic Herb Braided Bread is all about balance, so savor each bite while being mindful of your overall dietary needs!
FAQs about Garlic Herb Braided Bread
When it comes to baking, questions often pop up! Here are some friendly answers to common queries about garlic herb braided bread that you might find helpful.
How can I make the dough rise faster?
If you’re eager to get your garlic herb braided bread on the table, speeding up the rising process can be a game-changer. Here are a few tips:
- Warm Environment: Place the dough in a warm, draft-free area. An oven set to the lowest setting and then turned off works wonders.
- Use Warm Water: When mixing your dough, using warm (not hot!) water can encourage yeast activation.
- Sugar Boost: Adding a bit of sugar can feed the yeast, giving it a little kick to rise faster.
For more in-depth tips on yeast bread, check out this resource from the King Arthur Baking Company.
Can I use whole wheat flour instead of all-purpose flour?
Absolutely, you can substitute whole wheat flour in your garlic herb braided bread! However, keep in mind that the texture and flavor may differ slightly. To achieve a better outcome:
- Mix It Up: Use a blend of whole wheat and all-purpose flour for a lighter texture.
- Hydration: Whole wheat flour absorbs more liquid, so you might need to add a little extra water to the dough.
What’s the best way to store leftover bread?
Storing your garlic herb braided bread properly ensures it stays fresh for longer. Here’s how:
- Room Temperature: If you plan to eat it within a couple of days, wrap it in a clean kitchen towel or plastic wrap and leave it on the counter.
- Freezing: For longer storage, slice the bread, place it in a zip-top bag, and freeze. Just make sure to remove as much air as possible to avoid freezer burn.
Sharing your delicious creations is the icing on the cake—consider gifting pieces to friends or family! Cooking, much like sharing, brings people together. Happy baking!
Conclusion on Garlic Herb Braided Bread
When it comes to making garlic herb braided bread, the delightful blend of flavors and textures will elevate any meal. This bread is not only perfect as a standalone snack but also as a fabulous companion to soups, salads, or your favorite dipping sauces.
Imagine pulling a warm, fragrant loaf out of the oven, the rich aroma filling your kitchen—it’s a simple yet profound pleasure! Incorporating herbs like rosemary or thyme adds a gourmet touch, making this bread an impressive addition to your culinary repertoire.
So, why not give this recipe a try? You’ll soon discover that baking your own garlic herb braided bread is an enjoyable and rewarding experience. For more tips on bread-making, check out resources on The Bread Baker’s Apprentice or explore baking techniques on Serious Eats. Enjoy the journey!
PrintGarlic Herb Braided Bread: The Best Homemade Delight You’ll Love
A deliciously soft and flavorful garlic herb braided bread that is perfect for any occasion.
- Prep Time: 20 minutes
- Cook Time: 30 minutes
- Total Time: 1 hour 50 minutes
- Yield: 1 loaf 1x
- Category: Bread
- Method: Baking
- Cuisine: American
Ingredients
- 4 cups all-purpose flour
- 1 tablespoon instant yeast
- 2 teaspoons salt
- 1 tablespoon sugar
- 1 1/2 cups warm water
- 1/4 cup olive oil
- 3 cloves garlic, minced
- 2 tablespoons fresh rosemary, chopped
- 2 tablespoons fresh parsley, chopped
Instructions
- In a large bowl, combine flour, yeast, salt, and sugar.
- In another bowl, mix warm water and olive oil, then add to the dry ingredients.
- Knead the dough until smooth and elastic, about 10 minutes.
- Let the dough rise in a warm place until doubled in size, about 1 hour.
- Punch down the dough and incorporate minced garlic and herbs.
- Divide the dough into three equal sections and braid them together.
- Place the braided loaf on a baking sheet and let it rise for another 30 minutes.
- Bake in a preheated oven at 375°F (190°C) for 25-30 minutes or until golden brown.
- Let it cool before slicing and serving.
Notes
- Best served warm with butter.
- Can be topped with additional herbs before baking for extra flavor.
Nutrition
- Serving Size: 1 slice
Keywords: Garlic Herb Braided Bread, homemade bread, garlic bread, braided bread